Test01). The automation then loops through the matching contacts and uses a Call Contact step to place outbound calls with your AI Agent.
Use Cases
This automation is suitable for Thoughtly customers who:- Run outbound follow‑up or nurture campaigns (not cold-calling).
- Want to periodically call a segment of warm leads or existing customers.
- Prefer to manage who should be called using tags on Contacts instead of separate upload files.
- Are comfortable using API tokens and basic Automations configuration.
High-level flow
- A Recurring Schedule trigger starts the automation (you can run it on a schedule or manually).
- A Send Webhook step calls the Thoughtly
/contactAPI endpoint and returns all contacts with a given tag. - A Loop on Items step iterates over the list of contacts returned by the webhook.
- Inside the loop, a Call Contact step tells your chosen AI Agent to call each contact in turn.
Prerequisites
- You have access to Tools → Automations in your Thoughtly workspace.
- You have at least one AI Agent configured and able to make outbound calls.
- You have contacts created in Thoughtly, and some of them are tagged with the tag you plan to target (e.g.
Test01). - You have an API token and Team ID from Settings → Developer. You’ll need these for the Send Webhook headers.
- You have an outbound phone number connected to Thoughtly (via Thoughtly Flex or BYOC) and enough credits to place calls.
Step 1 – Tag the contacts you want to call
The automation targets contacts by tag. Before you build or run it, decide which segment you want to call and tag those contacts. Typical examples:Demo FollowupNo Answer – RetryWarm LeadDebt Settlement – List 1
Test01.
Step 2 – Create the automation shell
- In Thoughtly, go to Tools → Automations in the primary navigation.
- Click New Automation.
- Give it a clear name, such as Outbound – Call Tagged Contacts.
- Make sure the automation is in Draft mode (toggle in the top‑right) while you configure it.
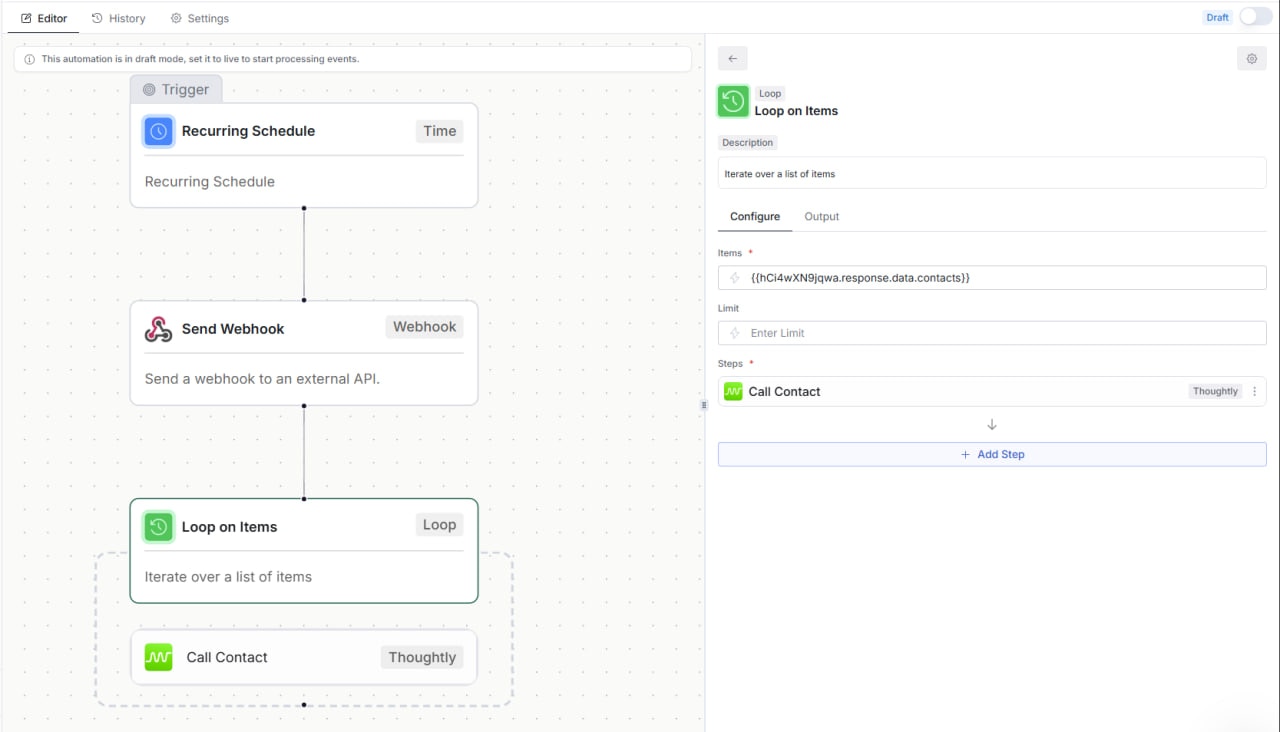
Overall automation layout
Step 3 – Configure the Recurring Schedule trigger
- For the trigger node, choose Time → Recurring Schedule.
- In the Configure tab on the right, set how often it should run:
- How often should this run? – e.g.
Daily,Weekly, orMonthly. - Day / Time / Timezone – pick the time window during which you want outbound calls to start.
- Business Hours – optionally restrict calls to a specific time window (e.g., 9:00 AM – 5:00 PM local time).
- How often should this run? – e.g.
- You can set a reasonable default schedule, but primarily control execution by switching the automation on and off manually if preferred.
Step 4 – Add a Send Webhook step to fetch tagged contacts
Next, we use a Send Webhook action to call the Thoughtly API and retrieve all contacts that have a particular tag.- Click the + button under the Recurring Schedule node and choose Send Webhook from the Webhook/Utility category.
- Select the Send Webhook node and go to the Configure tab.
-
In the URL field, paste a URL like the following (adjust the tag name and limit as needed):
https://api.thoughtly.com/contact?tags[]=Test01&limit=100&phone_numbers_only=true- Replace
Test01with the exact tag you want to target. limit=100controls how many contacts will be returned per run.phone_numbers_only=trueensures the API only returns contacts with valid phone numbers.
- Replace
-
Set Method to
GET. -
Under Headers, add the authentication headers required for the Thoughtly API:
- Key:
x-api-token→ Value: your API token - Key:
team_id→ Value: your Team ID
- Key:
![Send Webhook configuration — URL with tags[]=Test01, method set to GET, and an x-api-token header added.](https://mintcdn.com/thoughtly/iWcJydKiEz7OGghy/images/ui/automations/send-webhook-config.png?fit=max&auto=format&n=iWcJydKiEz7OGghy&q=85&s=c6103232e292f154caa23d2499f942ba)
Send Webhook configuration
Step 5 – Test the webhook using the Output tab
Before wiring the loop and call steps, verify that the webhook returns the contacts you expect.- With the Send Webhook node selected, switch to the Output tab on the right.
- Click Refresh. This will execute the webhook once using the URL and headers you configured.
- Check that:
- status shows
200(success). - The response object contains a
data.contactsarray. - Each contact object includes an
id, name, and phone number.
- status shows
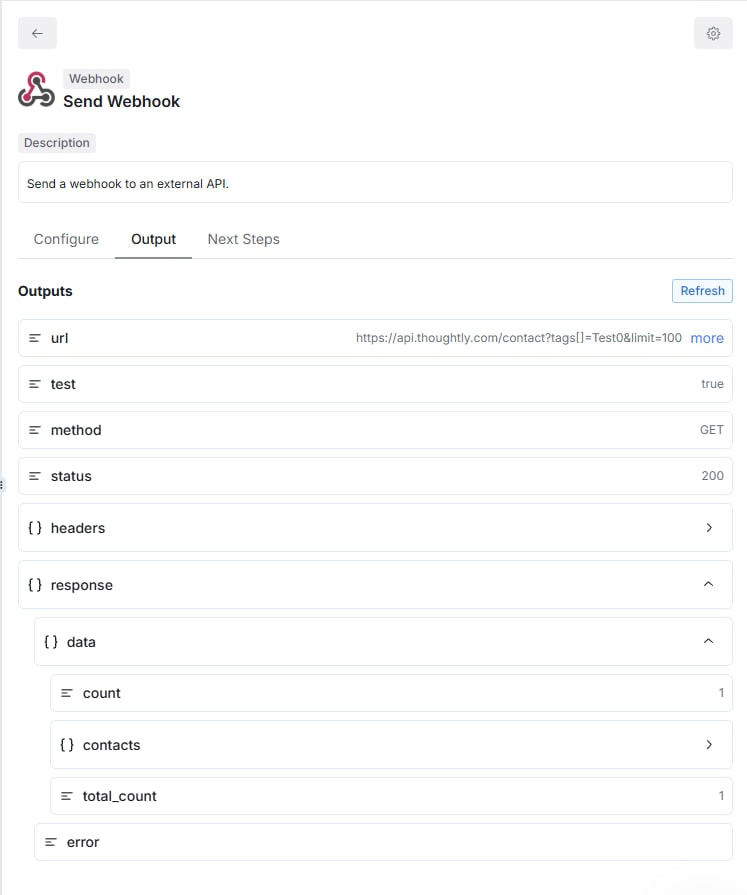
Output tab of the Send Webhook step
Step 6 – Add a Loop on Items step
Now that we can fetch the list of tagged contacts, we need to loop over them.- Click the + button under the Send Webhook node and select Loop on Items.
- Select the Loop node and go to the Configure tab.
- In the Items field, click Insert Variable.
- Choose Send Webhook → response.data.contacts from the variable picker. This tells the loop to iterate over each contact returned by the webhook.
- Optionally, you can set a Limit if you only want to call a subset of contacts per run.
Step 7 – Add a Call Contact step inside the Loop
Inside the loop, we use a Call Contact step to actually place the calls.- Click the + button inside the Loop block and select Call Contact (Thoughtly action).
- Select the Call Contact node and go to the Configure tab.
- For Contact, click Insert Variable and choose the current loop item’s ID (for example,
Loop → item.id). This connects the call to each contact returned by the webhook. - Under Select Agent, choose the AI Agent that should handle the call.
- Under Assign Genius / Knowledge Base, choose the knowledge base that contains the script and logic for these calls.
- (Optional) Enable Use Custom Phone Number and pick the outbound number you want these calls to come from.
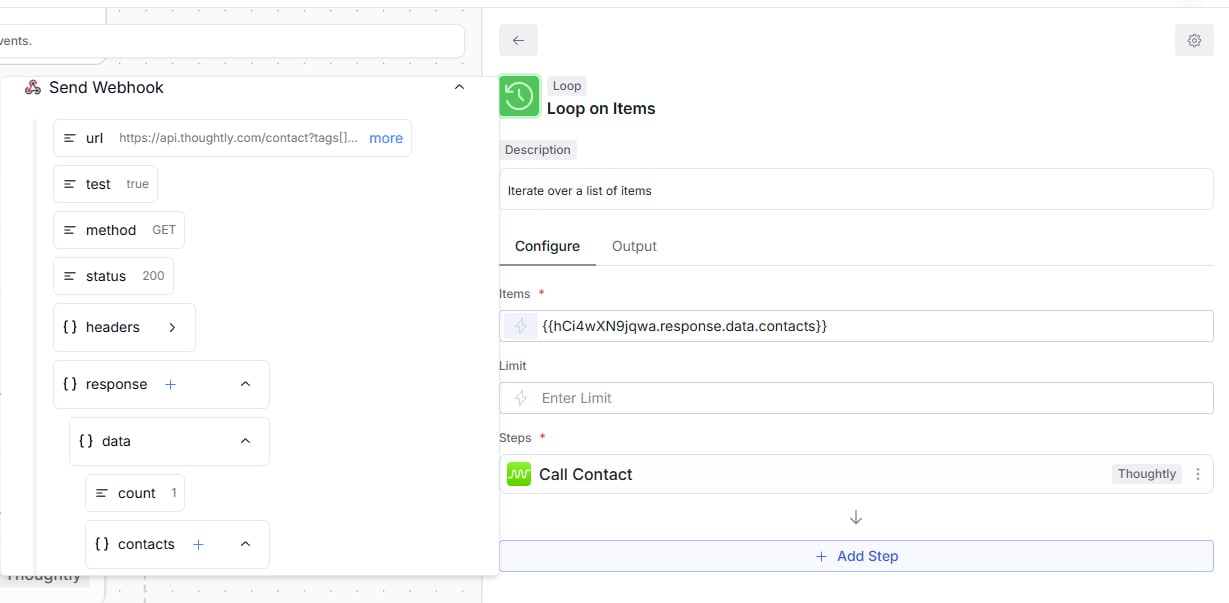
Loop on Items configured
Step 8 – Turn the automation on and run test calls
- Make sure everything is saved and the automation shows the full chain: Recurring Schedule → Send Webhook → Loop on Items → Call Contact.
- Start with just a few test contacts tagged (e.g., 1–3 contacts) so you can safely verify behaviour.
- When you’re ready, toggle the automation from Draft to Live in the top‑right.
- Open the History tab of the automation to monitor runs, see any errors, and confirm which contacts were called.
Nuances and best practices
- Always test with a small internal list first so you don’t accidentally call a large segment with an untested script.
- Consider adding post‑call logic (for example, tagging contacts as
CalledorDo Not Callbased on outcomes) in a separate On Call Completed automation (scoped to one agent, multiple agents, or All Agents) or via webhooks. - Keep an eye on your usage and any carrier‑level compliance requirements when running large outbound campaigns.
- If a run returns no contacts, double‑check that the tag name in the URL exactly matches your contact tags (including capitalization and spaces).
- You can duplicate this automation and change only the tag and agent to support multiple parallel campaigns.