> ## Documentation Index
> Fetch the complete documentation index at: https://docs.thoughtly.com/llms.txt
> Use this file to discover all available pages before exploring further.
# Voice cloning for agents
> Create custom voice clones for Thoughtly agents by recording or uploading audio samples directly inside the Agent Builder, with quality and consent tips.
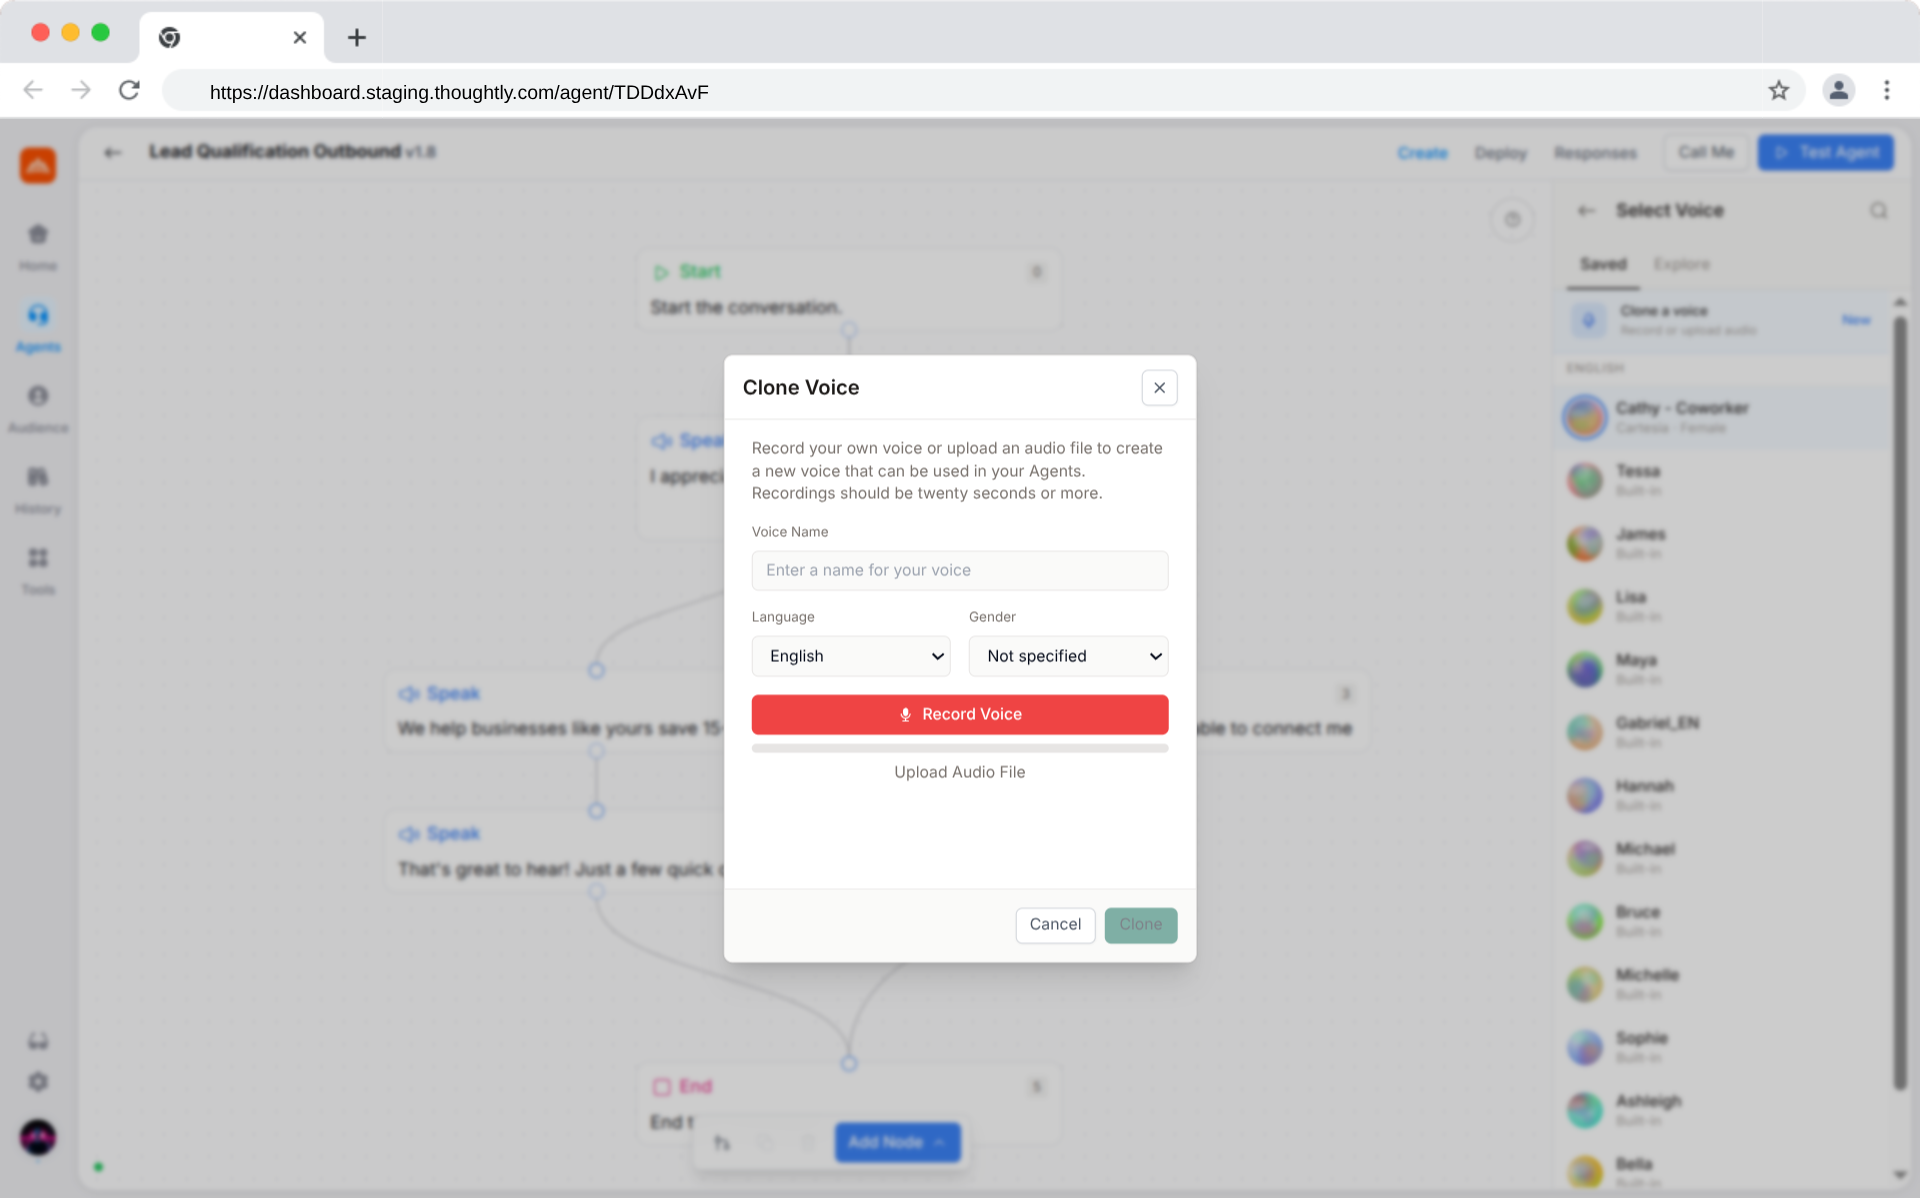
Create custom voice clones to give your agents a unique, brand-specific sound that isn't available in the public voice library. The **Clone Voice** modal is accessible directly from the **Saved** tab in the Agent Builder's Voice Selector.
## Requirements
| Requirement | Detail |
| ----------------------- | ------------------------------------------------------------------------------------------ |
| **Recording length** | Up to 20 seconds (stops automatically at 20 s). Record the full duration for best results. |
| **Upload length** | No length limit for uploads. Longer samples can improve quality. |
| **Input method** | Browser microphone recording **or** audio file upload |
| **Supported formats** | Any browser-compatible audio format (WAV, MP3, etc.) |
| **Browser permissions** | Microphone access must be granted for recording |
If your workspace uses [BYOK](/agents/voice-byok), cloned voices are created in your own provider account and tagged accordingly in the Saved tab (for example, **Your ElevenLabs**). This gives you full ownership and portability of your cloned voices.
## Cloning Step-by-Step
Open your agent → click the **Voice** field → in the **Saved** tab, click the **Clone a voice** banner at the top. The Clone Voice modal opens.
The Clone banner is hidden while the Saved tab search filter is active. Clear the filter text to see it again.
Enter a descriptive **Voice Name** (e.g. "Sarah, Sales US"). This is how the voice appears in your Saved tab.
Select the **Language** and **Gender** for the voice. These metadata fields help you filter and organize voices later.
Supported cloning languages: English, Spanish, French, German, Portuguese, Italian, Japanese, Korean, Chinese, Hindi, Dutch, Polish, Russian, Swedish, and Turkish.
Gender options: **Male**, **Female**, or **Not specified** (default).
**Option A, Record**: Click **Record Voice**. Speak naturally while the progress bar fills. Recording stops automatically at **20 seconds**, or click **Stop Recording** to end early. For best results, record the full 20 seconds.
**Option B, Upload**: Click **Upload Audio File** beneath the record button and select an audio file from your device.
After recording or uploading, an audio player lets you review the sample. Click **Discard Recording** to start over.
Click **Clone**. Processing typically takes 30 to 60 seconds. When complete, the modal switches to a results screen showing the voice name and a preview player.
Click **Done** to close the modal. Your new voice now appears in the **Saved** tab, ready to be assigned to any agent.
 ## Recording Best Practices
* **Quiet environment**: minimize background noise and echo
* **Quality microphone**: external mics give better results than built-in laptop mics
* **Consistent volume**: maintain a steady speaking level
* **Clear articulation**: speak naturally but avoid mumbling
* **Conversational style**: record in the tone you want agents to use
* **Complete sentences**: include full thoughts with natural pauses
* **Varied intonation**: demonstrate slight pitch and pacing variation
* **Full 20 seconds**: record the maximum duration for best results. For uploads, longer samples generally produce better clones.
* Grant microphone permissions when prompted by the browser
* Use Chrome or Edge for best recording compatibility
* Maintain a stable internet connection during upload and processing
## Managing Cloned Voices
After cloning, the voice is immediately available in the **Saved** tab of the Voice Selector alongside other saved voices and built-in defaults. You can:
* **Preview** it like any other voice (Play / Pause)
* **Assign** it to agents by clicking the voice row
* **Remove** it with the Bookmark icon or delete it from the results screen
### Workspace-Level Access
Cloned voices are scoped to your **workspace**:
* **Private**: not shared with other Thoughtly workspaces
* **Team-wide**: all workspace members can use cloned voices
* **Persistent**: voices remain until manually deleted
### Multi-Agent Usage
A single cloned voice can be assigned to **unlimited agents** simultaneously with no call-volume restrictions.
## Removing or Deleting a Cloned Voice
There are two ways to remove a cloned voice:
* **Delete** (permanent): On the results screen immediately after cloning, click **Delete**. This permanently destroys the voice.
* **Unsave** (remove from library): In the Saved tab, click the **filled Bookmark** icon on the cloned voice row. This removes it from your workspace's saved library.
Deleting or unsaving a cloned voice that is currently assigned to agents will cause those agents to fall back to the default voice.
## Legal and Ethical Considerations
**Consent is required.** Only clone voices from individuals who have explicitly authorized their voice to be used for AI synthesis in a business context.
* **Document consent**: keep written records of voice-use permissions
* **Professional use only**: limit usage to appropriate business contexts
* **Brand alignment**: ensure the voice represents your brand appropriately
## Data Storage and Privacy
* Raw audio is used for clone generation and stored securely within your workspace
* Cloned voice models are isolated per workspace. There is no cross-workspace access.
* Refer to Thoughtly's data retention policies for storage duration details
## Troubleshooting
* Check browser microphone permissions (Settings → Privacy → Microphone)
* Verify your microphone works in other apps
* Try a different browser (Chrome recommended)
* Re-record the **full 20 seconds** of clear, varied speech in a quiet room, or upload a longer audio file
* Use an external microphone if possible
* If uploading a file, ensure it's not heavily compressed or low-bitrate
* Allow up to 2 minutes for complex samples
* Check your network connection. The upload may have stalled
* Contact [support](/support/getting-help) with your Team ID if processing exceeds 5 minutes
* Confirm you reached the **results screen** (voice name + preview player shown)
* Close and reopen the Voice Selector panel
* Refresh the Agent Builder page
### Still stuck?
If none of the above resolves your issue:
1. Note your **Team ID** (found in workspace settings)
2. Describe the exact steps you took and what you expected to happen
3. [Contact support](/support/getting-help) with this information
## See Also
* [Agent Voices](/agents/voices): browse, preview, and assign voices
* [Agent Settings](/agents/settings): full agent configuration reference
* [Platform Billing](/platform/billing): understanding credit usage
## Recording Best Practices
* **Quiet environment**: minimize background noise and echo
* **Quality microphone**: external mics give better results than built-in laptop mics
* **Consistent volume**: maintain a steady speaking level
* **Clear articulation**: speak naturally but avoid mumbling
* **Conversational style**: record in the tone you want agents to use
* **Complete sentences**: include full thoughts with natural pauses
* **Varied intonation**: demonstrate slight pitch and pacing variation
* **Full 20 seconds**: record the maximum duration for best results. For uploads, longer samples generally produce better clones.
* Grant microphone permissions when prompted by the browser
* Use Chrome or Edge for best recording compatibility
* Maintain a stable internet connection during upload and processing
## Managing Cloned Voices
After cloning, the voice is immediately available in the **Saved** tab of the Voice Selector alongside other saved voices and built-in defaults. You can:
* **Preview** it like any other voice (Play / Pause)
* **Assign** it to agents by clicking the voice row
* **Remove** it with the Bookmark icon or delete it from the results screen
### Workspace-Level Access
Cloned voices are scoped to your **workspace**:
* **Private**: not shared with other Thoughtly workspaces
* **Team-wide**: all workspace members can use cloned voices
* **Persistent**: voices remain until manually deleted
### Multi-Agent Usage
A single cloned voice can be assigned to **unlimited agents** simultaneously with no call-volume restrictions.
## Removing or Deleting a Cloned Voice
There are two ways to remove a cloned voice:
* **Delete** (permanent): On the results screen immediately after cloning, click **Delete**. This permanently destroys the voice.
* **Unsave** (remove from library): In the Saved tab, click the **filled Bookmark** icon on the cloned voice row. This removes it from your workspace's saved library.
Deleting or unsaving a cloned voice that is currently assigned to agents will cause those agents to fall back to the default voice.
## Legal and Ethical Considerations
**Consent is required.** Only clone voices from individuals who have explicitly authorized their voice to be used for AI synthesis in a business context.
* **Document consent**: keep written records of voice-use permissions
* **Professional use only**: limit usage to appropriate business contexts
* **Brand alignment**: ensure the voice represents your brand appropriately
## Data Storage and Privacy
* Raw audio is used for clone generation and stored securely within your workspace
* Cloned voice models are isolated per workspace. There is no cross-workspace access.
* Refer to Thoughtly's data retention policies for storage duration details
## Troubleshooting
* Check browser microphone permissions (Settings → Privacy → Microphone)
* Verify your microphone works in other apps
* Try a different browser (Chrome recommended)
* Re-record the **full 20 seconds** of clear, varied speech in a quiet room, or upload a longer audio file
* Use an external microphone if possible
* If uploading a file, ensure it's not heavily compressed or low-bitrate
* Allow up to 2 minutes for complex samples
* Check your network connection. The upload may have stalled
* Contact [support](/support/getting-help) with your Team ID if processing exceeds 5 minutes
* Confirm you reached the **results screen** (voice name + preview player shown)
* Close and reopen the Voice Selector panel
* Refresh the Agent Builder page
### Still stuck?
If none of the above resolves your issue:
1. Note your **Team ID** (found in workspace settings)
2. Describe the exact steps you took and what you expected to happen
3. [Contact support](/support/getting-help) with this information
## See Also
* [Agent Voices](/agents/voices): browse, preview, and assign voices
* [Agent Settings](/agents/settings): full agent configuration reference
* [Platform Billing](/platform/billing): understanding credit usage