> ## Documentation Index
> Fetch the complete documentation index at: https://docs.thoughtly.com/llms.txt
> Use this file to discover all available pages before exploring further.
# Node types in the Agent Builder
> Reference for every node type in the Thoughtly Agent Builder, including message, decision, action, transfer, and end nodes that shape conversation flow.
export const NextSection = ({title, icon, href, description}) =>
{description}
;
Thoughtly agents use four node types: **Start**, **Speak**, **Transfer**, and **End**. Use the canvas toolbar at the bottom center of the screen to manage nodes and organize your flow.
Each node is automatically assigned a sequential step number that helps you track conversation flow during testing and call replay. The Start node is always step 0, and subsequent nodes are numbered sequentially (1, 2, 3, etc.). These step numbers appear in the UI, test logs, and when referencing node responses in variables.
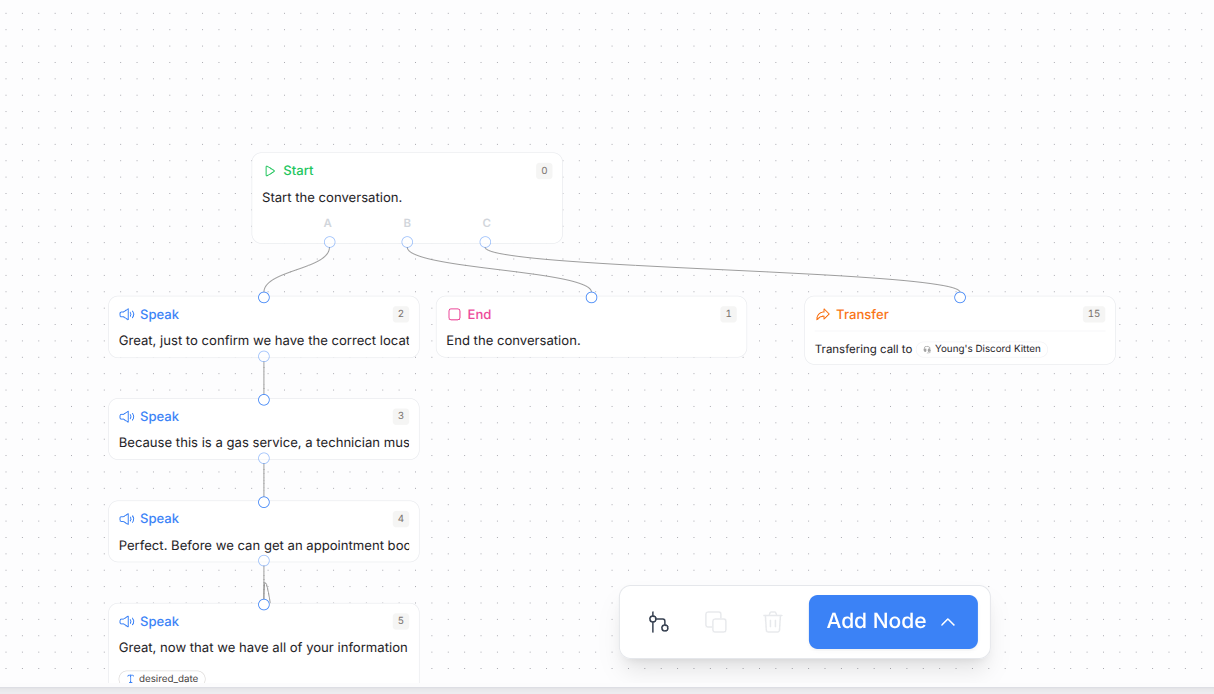 ## Canvas toolbar
The canvas toolbar appears at the bottom center of the Agent Builder and provides quick access to common actions:
* **Auto-organize** - Automatically arranges nodes in a clean, readable layout
* **Duplicate** - Clones the selected node with correct positioning (requires a node to be selected)
* **Delete** - Removes the selected node and its connected edges (requires a node to be selected)
* **Add Node** - Opens a menu to create new nodes:
* **Speak** - Creates a speak/question node
* **Transfer** - Creates a transfer\_action node
* **End** - Creates an end node
The Duplicate and Delete buttons are only enabled when you have a node selected on the canvas.
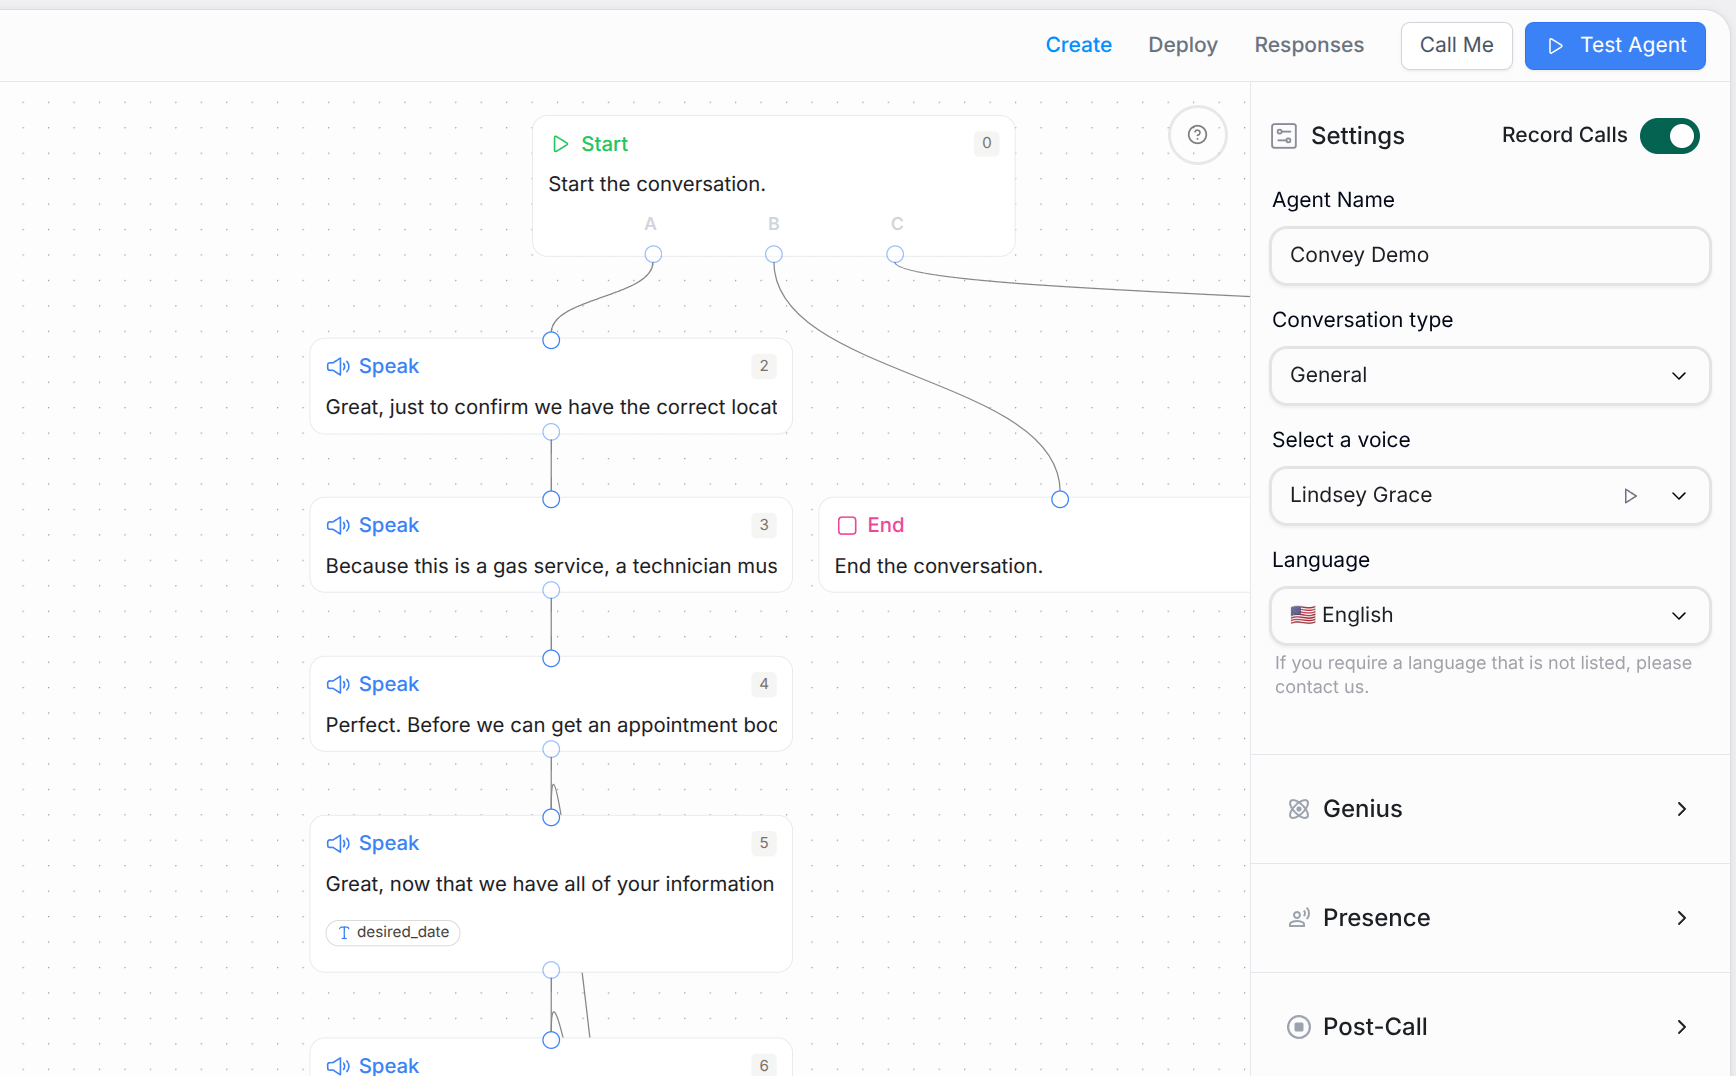
## Start node
**What it does:** Opens the conversation. Whatever you write here is the first thing your caller hears.
**Guidelines**
* Keep it short and attention grabbing.
* Use plain language; avoid jargon.
* Proofread carefully; content in **Start** is repeated verbatim.
**Tips**
* If you need legal or opt-in wording, keep it here so it is always delivered the same way.
* Consider referencing [Variables](/agents/variables) for simple personalization (for example, the caller's first name), but test pronunciation with [Call Me](/agents/testing#call-me-real-call).
Everything in the Start node's **Message** field is spoken exactly as written. Double-check spelling, punctuation, and acronyms.
## Speak node
## Canvas toolbar
The canvas toolbar appears at the bottom center of the Agent Builder and provides quick access to common actions:
* **Auto-organize** - Automatically arranges nodes in a clean, readable layout
* **Duplicate** - Clones the selected node with correct positioning (requires a node to be selected)
* **Delete** - Removes the selected node and its connected edges (requires a node to be selected)
* **Add Node** - Opens a menu to create new nodes:
* **Speak** - Creates a speak/question node
* **Transfer** - Creates a transfer\_action node
* **End** - Creates an end node
The Duplicate and Delete buttons are only enabled when you have a node selected on the canvas.
## Start node
**What it does:** Opens the conversation. Whatever you write here is the first thing your caller hears.
**Guidelines**
* Keep it short and attention grabbing.
* Use plain language; avoid jargon.
* Proofread carefully; content in **Start** is repeated verbatim.
**Tips**
* If you need legal or opt-in wording, keep it here so it is always delivered the same way.
* Consider referencing [Variables](/agents/variables) for simple personalization (for example, the caller's first name), but test pronunciation with [Call Me](/agents/testing#call-me-real-call).
Everything in the Start node's **Message** field is spoken exactly as written. Double-check spelling, punctuation, and acronyms.
## Speak node
 **What it does:** Drives the conversation. Speak nodes decide what the agent says, how it says it, and when it moves on.
Speak nodes come in two variants: **Message** and **Prompt**.
### 1) Message speak node
* **Use when:** You want the agent to say a specific line (short answer, confirmation, compliance statement) with minimal variation.
* **Behavior:** The agent speaks the text you provide, using context only to keep tone natural.
* **Speech settings:** Click the gear icon in the message header to access speech options:
* **Verbatim:** Say exactly what is written every time (just like the [Start node](#start-node)). Ideal for consent or disclaimers.
* **Uninterrupted:** Prevents the caller from interrupting. Useful for longer instructions or critical copy.
* **Spell Numbers:** Improves pronunciation of long numbers such as order IDs or confirmation codes by reading them digit-by-digit. Pair with [Phone numbers](/phone-number/getting-started) and other numeric data.
* **Good for:** Simple Q\&A, confirmations, disclaimers, short instructions.
A blue indicator dot appears on the settings icon when any speech setting is active, making it easy to see which nodes have special configurations.
### 2) Prompt speak node
* **Use when:** The agent must compose a response using multiple pieces of information (purchase details, caller info, integration outputs, dynamic Q\&A).
* **Behavior:** Treat the field as instructions for how the agent should respond. Think mini playbook, not a fixed script.
* **Speech settings:** Click the gear icon in the message header to access speech options:
* **Uninterrupted:** Prevents the caller from interrupting. Useful for longer instructions or critical copy.
* **Spell Numbers:** Improves pronunciation of long numbers by reading them digit-by-digit.
* Note: **Verbatim** is not available in Prompt mode by design; prompts stay adaptive.
* **Authoring tips**
* Write in the order: goal -> constraints -> must-say points -> tone. Keep it concise.
* Reference data via [Variables](/agents/variables) such as CRM fields or custom attributes.
* Specify the delivery channel if it matters ("Keep under 160 characters for SMS.").
* End with a clarity cue such as "Keep it short and concise."
* **Pro tip:** Frontier models (GPT-5, Gemini 2.5, and similar) are great at drafting first-pass prompts. Ask for a proposal, then adapt it inside your Prompt speak node.
## Early summaries
End nodes and Transfer nodes can generate a summary before the call ends or transfers. Early summaries are useful when another system or human needs context immediately instead of waiting for normal post-call processing.
When enabled:
* The summary is generated before the final hangup or transfer.
* Downstream systems can retrieve the summary using the call or interview response identifier where supported.
* Warm transfers can include context for the receiving team.
Use early summaries for live handoffs, urgent support workflows, or integrations that need immediate post-call context.
## Transfer node
**What it does:** Drives the conversation. Speak nodes decide what the agent says, how it says it, and when it moves on.
Speak nodes come in two variants: **Message** and **Prompt**.
### 1) Message speak node
* **Use when:** You want the agent to say a specific line (short answer, confirmation, compliance statement) with minimal variation.
* **Behavior:** The agent speaks the text you provide, using context only to keep tone natural.
* **Speech settings:** Click the gear icon in the message header to access speech options:
* **Verbatim:** Say exactly what is written every time (just like the [Start node](#start-node)). Ideal for consent or disclaimers.
* **Uninterrupted:** Prevents the caller from interrupting. Useful for longer instructions or critical copy.
* **Spell Numbers:** Improves pronunciation of long numbers such as order IDs or confirmation codes by reading them digit-by-digit. Pair with [Phone numbers](/phone-number/getting-started) and other numeric data.
* **Good for:** Simple Q\&A, confirmations, disclaimers, short instructions.
A blue indicator dot appears on the settings icon when any speech setting is active, making it easy to see which nodes have special configurations.
### 2) Prompt speak node
* **Use when:** The agent must compose a response using multiple pieces of information (purchase details, caller info, integration outputs, dynamic Q\&A).
* **Behavior:** Treat the field as instructions for how the agent should respond. Think mini playbook, not a fixed script.
* **Speech settings:** Click the gear icon in the message header to access speech options:
* **Uninterrupted:** Prevents the caller from interrupting. Useful for longer instructions or critical copy.
* **Spell Numbers:** Improves pronunciation of long numbers by reading them digit-by-digit.
* Note: **Verbatim** is not available in Prompt mode by design; prompts stay adaptive.
* **Authoring tips**
* Write in the order: goal -> constraints -> must-say points -> tone. Keep it concise.
* Reference data via [Variables](/agents/variables) such as CRM fields or custom attributes.
* Specify the delivery channel if it matters ("Keep under 160 characters for SMS.").
* End with a clarity cue such as "Keep it short and concise."
* **Pro tip:** Frontier models (GPT-5, Gemini 2.5, and similar) are great at drafting first-pass prompts. Ask for a proposal, then adapt it inside your Prompt speak node.
## Early summaries
End nodes and Transfer nodes can generate a summary before the call ends or transfers. Early summaries are useful when another system or human needs context immediately instead of waiting for normal post-call processing.
When enabled:
* The summary is generated before the final hangup or transfer.
* Downstream systems can retrieve the summary using the call or interview response identifier where supported.
* Warm transfers can include context for the receiving team.
Use early summaries for live handoffs, urgent support workflows, or integrations that need immediate post-call context.
## Transfer node
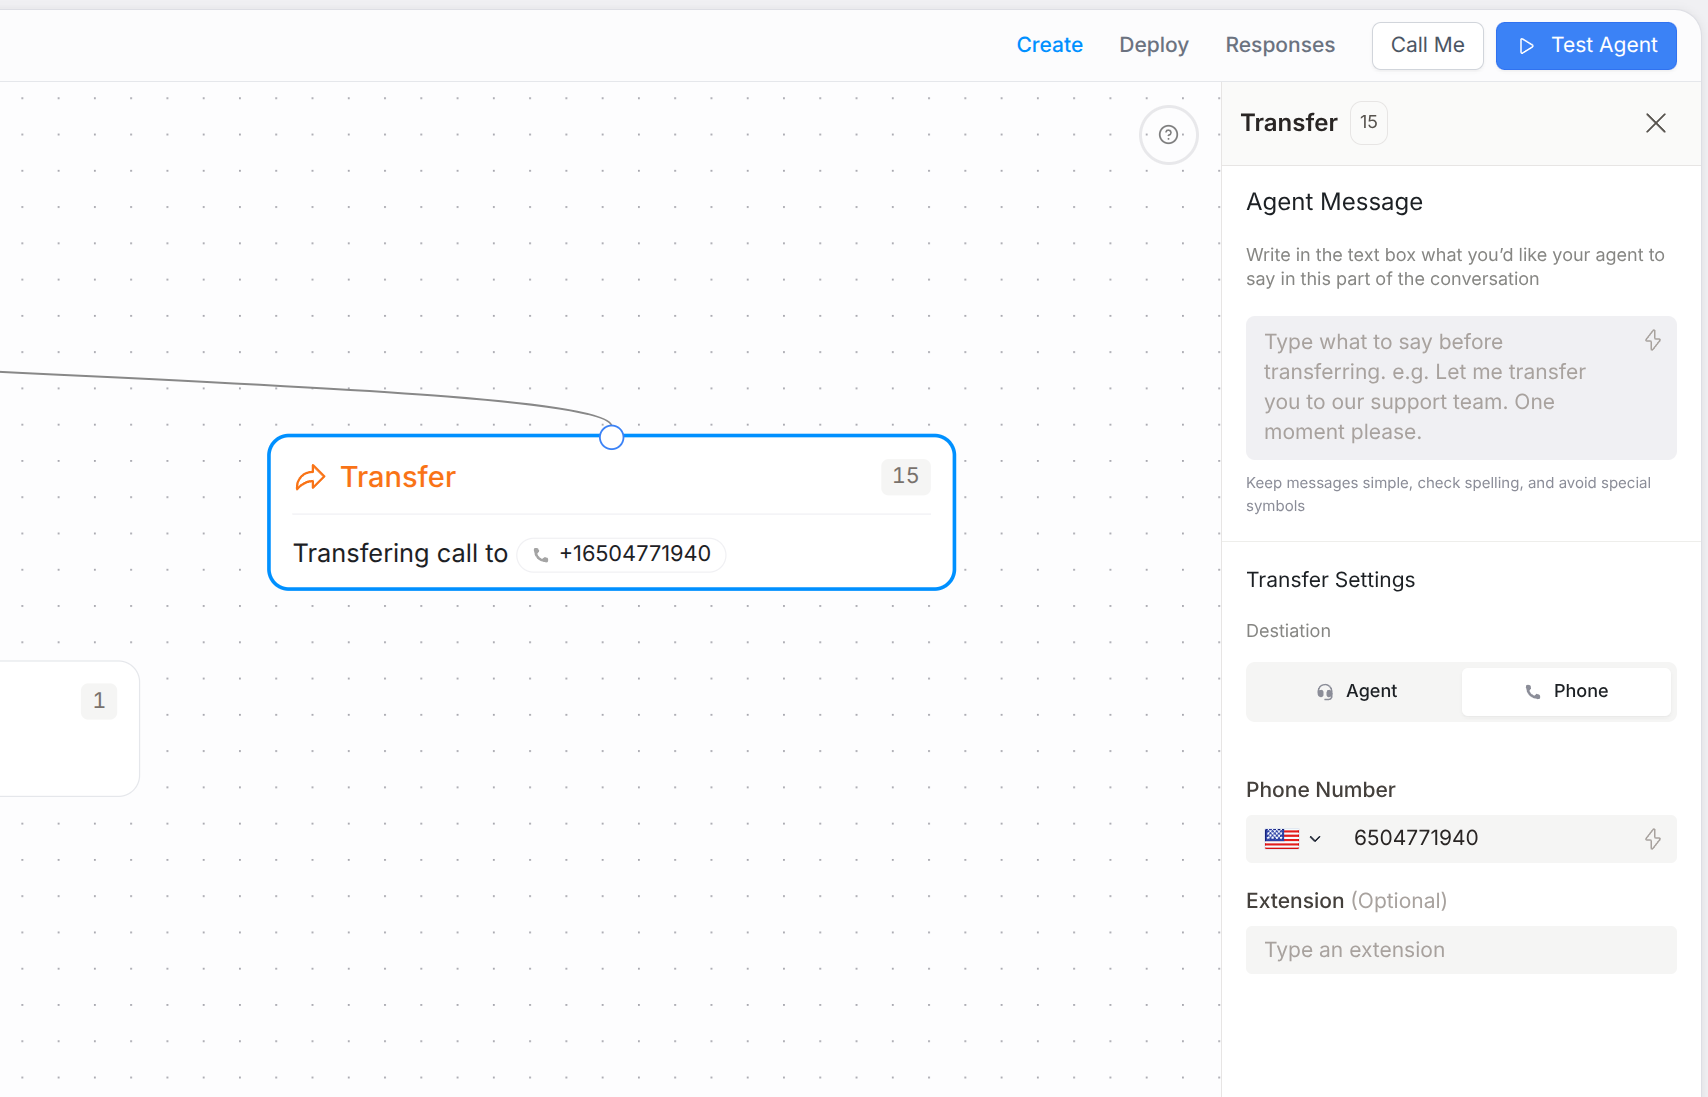 **What it does:** Hands the caller to a human or another agent.
Transfer nodes offer two modes:
### 1) Phone Router
* Transfers the caller to a specific [Phone number](/phone-number/getting-started).
* Optional pre-transfer **Message** lets the agent speak before the hand-off.
* The transfer occurs immediately after that message (if present).
* Phone numbers are validated in real-time using country-aware formatting rules to prevent transfer failures.
* Optional **Extension** field allows you to specify an extension number for the transfer destination.
Content in the Phone Router **Message** is spoken exactly as written. Proofread it before publishing.
**Phone number validation**
* The system automatically validates phone numbers based on the selected country's formatting rules.
* Validation appears after you enter 7 or more digits.
* Leading and trailing whitespace is automatically trimmed to prevent invisible character issues.
* You can use [Variables](/agents/variables) in the phone number field; validation is bypassed when variables are present.
* Invalid phone numbers will show an error message and prevent the node from being saved until corrected.
Use the country dropdown to ensure your phone number is validated against the correct country's format. The system supports international phone numbers with proper country codes.
**Extension field**
* The **Extension** field supports both static text and dynamic [Variables](/agents/variables).
* Use the bolt icon (⚡) to insert variables such as `{{system.contact.email}}` or custom extracted data.
* Variables appear as styled chips in the field for easy identification.
* Extension values are sent to the destination phone system after the call is connected.
### 2) Agent Transfer
* Connects the caller to another [Agent](/agents/overview) in your account with no extra setup.
* Select the target agent from your list; the current agent session ends when the transfer begins.
* Optional pre-transfer **Description** lets you customize what the agent says before the hand-off (defaults to "Transferring you to \[agent name] now").
* Ideal for warm hand-offs or specialist escalation after identity verification or form capture.
**When to use Transfer**
* Call routing after qualification.
* Escalation to a specialist team.
* Warm hand-offs after identity verification or form capture via [Actions](/agents/actions).
## End node
**What it does:** Closes the conversation gracefully and hands control back to any downstream [Automations](/automations/getting-started).
**Guidelines**
* Keep the goodbye short and courteous.
* Use consistent endings across flows to reinforce brand tone.
* Create multiple **End** nodes to close different branches (success, voicemail, no-match).
Content in the End node's **Message** is spoken exactly as written. Review it for accuracy.
## Quick decision guide
* **Fixed line that must be exact?** -> Use **Start** or Speak > **Message** with **Repeat verbatim**.
* **Adaptive response using data or context?** -> Use Speak > **Prompt**.
* **Need to hand off?** -> Use **Transfer** (Phone Router or Agent Transfer).
* **Conversation finished?** -> Use **End**.
## Common mistakes to avoid
* Putting long scripts in **Start**; keep the opener tight.
* Using **Prompt** when an exact line is required; select **Message** + **Verbatim** instead.
* Forgetting to enable **Uninterrupted** for critical information.
* Skipping pronunciation checks; turn on **Spell Numbers** for IDs, order numbers, or [Phone numbers](/phone-number/getting-started).
* Missing the speech settings icon; click the gear icon in the message header to access all speech options.
## See also
* [Variables](/agents/variables) - personalize messages safely and branch on captured data.
* [Phone Numbers](/phone-number/getting-started) - formatting, country codes, and testing.
* [Agents](/agents/overview) - creating, naming, and organizing agents.
* [Outcomes](/agents/outcomes) - routing logic after Speak nodes.
* [Actions](/agents/actions) - mid-call work, lookups, and best practices.
**What it does:** Hands the caller to a human or another agent.
Transfer nodes offer two modes:
### 1) Phone Router
* Transfers the caller to a specific [Phone number](/phone-number/getting-started).
* Optional pre-transfer **Message** lets the agent speak before the hand-off.
* The transfer occurs immediately after that message (if present).
* Phone numbers are validated in real-time using country-aware formatting rules to prevent transfer failures.
* Optional **Extension** field allows you to specify an extension number for the transfer destination.
Content in the Phone Router **Message** is spoken exactly as written. Proofread it before publishing.
**Phone number validation**
* The system automatically validates phone numbers based on the selected country's formatting rules.
* Validation appears after you enter 7 or more digits.
* Leading and trailing whitespace is automatically trimmed to prevent invisible character issues.
* You can use [Variables](/agents/variables) in the phone number field; validation is bypassed when variables are present.
* Invalid phone numbers will show an error message and prevent the node from being saved until corrected.
Use the country dropdown to ensure your phone number is validated against the correct country's format. The system supports international phone numbers with proper country codes.
**Extension field**
* The **Extension** field supports both static text and dynamic [Variables](/agents/variables).
* Use the bolt icon (⚡) to insert variables such as `{{system.contact.email}}` or custom extracted data.
* Variables appear as styled chips in the field for easy identification.
* Extension values are sent to the destination phone system after the call is connected.
### 2) Agent Transfer
* Connects the caller to another [Agent](/agents/overview) in your account with no extra setup.
* Select the target agent from your list; the current agent session ends when the transfer begins.
* Optional pre-transfer **Description** lets you customize what the agent says before the hand-off (defaults to "Transferring you to \[agent name] now").
* Ideal for warm hand-offs or specialist escalation after identity verification or form capture.
**When to use Transfer**
* Call routing after qualification.
* Escalation to a specialist team.
* Warm hand-offs after identity verification or form capture via [Actions](/agents/actions).
## End node
**What it does:** Closes the conversation gracefully and hands control back to any downstream [Automations](/automations/getting-started).
**Guidelines**
* Keep the goodbye short and courteous.
* Use consistent endings across flows to reinforce brand tone.
* Create multiple **End** nodes to close different branches (success, voicemail, no-match).
Content in the End node's **Message** is spoken exactly as written. Review it for accuracy.
## Quick decision guide
* **Fixed line that must be exact?** -> Use **Start** or Speak > **Message** with **Repeat verbatim**.
* **Adaptive response using data or context?** -> Use Speak > **Prompt**.
* **Need to hand off?** -> Use **Transfer** (Phone Router or Agent Transfer).
* **Conversation finished?** -> Use **End**.
## Common mistakes to avoid
* Putting long scripts in **Start**; keep the opener tight.
* Using **Prompt** when an exact line is required; select **Message** + **Verbatim** instead.
* Forgetting to enable **Uninterrupted** for critical information.
* Skipping pronunciation checks; turn on **Spell Numbers** for IDs, order numbers, or [Phone numbers](/phone-number/getting-started).
* Missing the speech settings icon; click the gear icon in the message header to access all speech options.
## See also
* [Variables](/agents/variables) - personalize messages safely and branch on captured data.
* [Phone Numbers](/phone-number/getting-started) - formatting, country codes, and testing.
* [Agents](/agents/overview) - creating, naming, and organizing agents.
* [Outcomes](/agents/outcomes) - routing logic after Speak nodes.
* [Actions](/agents/actions) - mid-call work, lookups, and best practices.